Monday, August 24, 2009

Thursday, August 20, 2009
More details about the house
 We bought this house in the spring of 2005, and spent the last 3 years turning an original Cambie house into an executive home that we are proud of, and plan on living in for many years to come. Mostly through our own sweat and hard work, we've transformed the interior space into a warm, inviting an open environment, without sacrificing the feel of a 1930s character home. Everything on the main floor has been replaced, renovated, or re-done. Every square inch of the house has been re-painted, inside and out. New fittings and fixtures were chosen with the 1930s period in mind, and except for the modern, stainless steel appliances, the style is one very much in step with the Art Deco/Art Moderne styling of the time.
 The main renovation/update occurred in the kitchen; we completely gutted it, removing the extensive cedar paneling and cupboards that were likely installed in the 1960s. We removed the wall between a small bedroom and the 11' x 12' kitchen, added a conversational island, creating a TV room adjacent to the kitchen. This new 24' x 11' room is the central nexus for our daily lives. Rich cherry-wood cabinets, solid black granite countertops and indirect lighting sources create a warm ambiance and cozy feel. Technology enhancements include Wi-Fi and wired high-speed internet access, 34" widescreen TV, over 350 DVD titles to choose from, over 4,000 MP3 songs available through streaming audio, and 5.1 speaker surround audio system with iPod dock.
 In the bathroom, we also stripped off the cedar paneling again, demo-ed down to the studs, and replaced the vanity with the same rich, cherry-wood cabinetry, topped with solid marble and undermount sink. We installed a heating mat under the tiles to keep bare feet warm during the cool winter months. 1920s railway-styled towel bars and fixtures, halogen lighting and a huge, beveled glass mirror framed in cherry wood round out the feature upgrades of our new bathroom.
The dining room got a fresh coat of paint, new window treatment, and a new light fixture with dimmer. Our 6-person dining set and art deco sideboard finish the room nicely - a great place to enjoy a scrumptious local BC salmon dinner with your other guests!
 The living room got a huge cosmetic upgrade when we jackhammered out the 1970s-era brick mantle/hearth. We removed the cedar (yes, even more cedar) paneling from the wall, put up new drywall and re-framed the leaded-glass windows. I extended secondary speakers into the living room wall, so that music can be played (independently) from the source in the TV room. The finishing touch is the new Art Deco-styled mantle and natural gas fireplace - remote controlled, of course. A nice glass of port, a snifter of cognac or a wee dram of scotch, and this is the place to wind down the evening, and share the stories of the day.
Wednesday, August 19, 2009
The neighbourhood
Cambie Street was named after Henry John Cambie, a surveyor born in Ireland, who was charged with the task for bringing the CPR (Canadian Pacific Railway) to its terminus on the coast, which he decided would be Vancouver. King Edward Avenue, our nearest major cross-street (1 block), was named after King Edward VII (and not the infamous "Longshanks" King Edward I, from the epic "Braveheart").
 The Cambie area is centred around City Hall, an iconic building built in 1936, typifying the Art Deco/Art Moderne styling of the day. The area north of King Edward developed in the boom years following the turn of the 19th century. By 1926, houses dotted the area surrounding Douglas Park, and by the mid-1950s, the last remaining raw land just north of 41st Avenue (used as army barracks during the war) was released by the federal government for development. Our house was built in 1938 along with most of the houses on our street.
 A central thoroughfare to get back and forth to downtown Vancouver, Cambie Street is also populated with many shops and restaurants, mostly between 12th and 19th Avenue, known as Cambie Village. The underground, "Canada Line" runs underneath Cambie street, and will operate service from Richmond and the Vancouver Airport, through to downtown Vancouver. While the underground construction was inconvenient, the residents of the South Cambie area are now reaping the benefits, as the City has made extensive streetscape improvements to the area, including improved street lighting, widened sidewalks and landscaping. While Cambie Village offers residents most services needed for everyday living, the central location allows easy access to the diversity of Vancouver.
City Square Shopping Centre, a neighbourhood mall built around two heritage school buildings, incorporates modern design elements with the original architecture and houses over 50 shops and services. If you want more diversity, only 5 minutes (or one tube stop) south, is the much larger, Oakridge Centre offers over 150 shops and services, including The Bay, Banana Republic, Nine West and many other fashion retailers. Oakridge also has movie theatres, so that you can avoid the hustle and bustle of downtown if you merely want to take in a first-run movie.
Just six blocks East, you will find Cambie Street's alter-ego - Main Street. A vibrant, eclectic mix of shops, bistros, pubs and services, South Main (SoMa) is bustling with activity, day and night. You won't find any chain stores here; instead, you'll uncover trendy boutiques, novelty shops and ethnic restaurants of all origin. Vintage clothing shops, antique stores and art galleries dot the strip. A few minutes South in a car or bus will put you at the edge of Little India, where you can get some of the finest East Indian cuisine in town.
 Two of the "Top Ten Vancouver Adventures" are only a 10-minute walk from our house; Queen Elizabeth Park, and The Bloedel Conservatory. Stroll through the gardens in the two former stone quarrys and enjoy the views from the world-famous Seasons restaurant. Or escape the winter chill by exploring the indoor lush tropical environment, with over 100 free-flying exotic birds and colourful Koi fish.
 The Cambie area is centred around City Hall, an iconic building built in 1936, typifying the Art Deco/Art Moderne styling of the day. The area north of King Edward developed in the boom years following the turn of the 19th century. By 1926, houses dotted the area surrounding Douglas Park, and by the mid-1950s, the last remaining raw land just north of 41st Avenue (used as army barracks during the war) was released by the federal government for development. Our house was built in 1938 along with most of the houses on our street.
 A central thoroughfare to get back and forth to downtown Vancouver, Cambie Street is also populated with many shops and restaurants, mostly between 12th and 19th Avenue, known as Cambie Village. The underground, "Canada Line" runs underneath Cambie street, and will operate service from Richmond and the Vancouver Airport, through to downtown Vancouver. While the underground construction was inconvenient, the residents of the South Cambie area are now reaping the benefits, as the City has made extensive streetscape improvements to the area, including improved street lighting, widened sidewalks and landscaping. While Cambie Village offers residents most services needed for everyday living, the central location allows easy access to the diversity of Vancouver.
City Square Shopping Centre, a neighbourhood mall built around two heritage school buildings, incorporates modern design elements with the original architecture and houses over 50 shops and services. If you want more diversity, only 5 minutes (or one tube stop) south, is the much larger, Oakridge Centre offers over 150 shops and services, including The Bay, Banana Republic, Nine West and many other fashion retailers. Oakridge also has movie theatres, so that you can avoid the hustle and bustle of downtown if you merely want to take in a first-run movie.
Just six blocks East, you will find Cambie Street's alter-ego - Main Street. A vibrant, eclectic mix of shops, bistros, pubs and services, South Main (SoMa) is bustling with activity, day and night. You won't find any chain stores here; instead, you'll uncover trendy boutiques, novelty shops and ethnic restaurants of all origin. Vintage clothing shops, antique stores and art galleries dot the strip. A few minutes South in a car or bus will put you at the edge of Little India, where you can get some of the finest East Indian cuisine in town.
 Two of the "Top Ten Vancouver Adventures" are only a 10-minute walk from our house; Queen Elizabeth Park, and The Bloedel Conservatory. Stroll through the gardens in the two former stone quarrys and enjoy the views from the world-famous Seasons restaurant. Or escape the winter chill by exploring the indoor lush tropical environment, with over 100 free-flying exotic birds and colourful Koi fish.
Saturday, September 30, 2006
The man cave/scotch lounge
2 cans of paint - $59
4 Ikea bookshelves - $325
misc. hardware and lighting - $250
custom cabinet work - a day's worth of sweat equity
Having a new haven in the basement - priceless
The slideshow gives you an idea of how I have transformed the basement over the past year or so. The original owners used the basement living space as a play area for the kids - why should I be any different?
So the truth be told, one of the factors for buying this particular house, was the presence of a basement living space that could be set up for home theatre. It was supposed to be a bit of a longer term plan, as I had designed the upstairs TV area with full theatre surround (5.1) capability. But the wheels were spinning, and a google, here, and a click there, and I was sold on putting a front projection system in the basement living room.
Actually, I had sold myself on a cool Optoma H31/screen combo from Costco, but then a buddy of mine told me that another co-worker in Calgary was selling one of his two projectors (long story). So for only $650, I was able to get a pretty decent projector and a ceiling mount. Add a 92" screen from Costco for only $239, and I'm doing big screen theatre for under a grand!
Ok, so I already had a pair of Bose 301s from 1979, a pair of Bose 201s and a Polk Audio centre, the Denon receiver and a DVD recorder (need the tuner to watch TV). The cool thing about the Denon receiver, is that it can do component video switching, which makes cabling and user interface much easier. Purists would say to run the signals separately, but the neophyte can't see the difference. Besides, what are you going to compare it to?
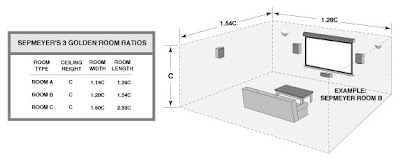 One of the reasons why this room works so well as a home theatre, is the acoustics. Any engineer understands the wave properties of sound, and the behaviour of a a wave as they hit solid objects. I won't get into the physics of standing waves and their cancellation effects; essentially audio sounds great when you have a room with the right dimensions. All the fancy home theatre mags talk about building your room to fit the acoustic dimensions shown right - I just got lucky. With a height of 6' 6", 11' wide and a little over 14' long, it is almost exactly the right ratio to match what is called Sepmeyer's golden room ratio (in my case, Room C). All I know, is that without anything fancy, the sound is awesome down there. I also swapped my little 8" Yamaha sub with the bigger 10" Harman Kardon from upstairs. Needless to say, Christine has to flick the lights from the top of the stairs to get me to turn it down :)
Since the room was finished already, but when I put down the new laminate flooring (for the upcoming addition of our new puppy) I was able to hide the wiring for the rear speakers and an additional Cat 5 ethernet run. The last, best thing for the home theatre setup, was a Logitech Harmony remote. It's the coolest thing to replace the 5 remotes that I needed to run the complete system... and it can all be operated by menu-driven commands. Very cool.
 Having the home theatre in the basement is great, and we have been watching lots of movies down there. However, the room was kinda weird. I had a big tube TV in the corner; because of it's size, I had the leather club chair on the wrong side of the room. After browsing through many home theatre web sites, I found that all the designs were geared towards using the room as a theatre 100% of the time. I didn't want rows of seats, but rather a room that was inviting even when the big screen isn't in use. I was flipping through a home reno mag, I came across this basement design shown left. I didn't have room for a fireplace (would have been nice), but I liked the idea of keeping the brown wood accents. It would be nice to have a wet bar and all the cool stuff that is shown in the example, but the kitchen is only a few steps away, so I don't really need it. But this room was pretty close to the look of mine, and gave me the inspiration I needed.
The basement was probably finished sometime in the 70s, and the doors, mouldings and windows were stained and finished medium brown. I already had a medium brown entertainment unit, and a coffee table that roughly matched. So after a week or two of pondering the design, I came up with an open bookcase surround for the screen. I figured it would "finish" that end of the room up - it was a haphazard collection of stuff that needed organising.
The 24" tube TV that Bob gave me had to go. It was on the wrong side of the room, and it forced the leather club chair to the right. That made it kind of awkward, as it sat in front of the couch - not even close to a conversational angle. So by getting rid of the tube, it allowed me to put the club chair on the other side, and make much better use of the space. I picked up a cheap ($300) LCD TV for watching the Simpsons (or anything but Survivor) while Chris is taking in America's Top Model upstairs.
4 Ikea bookshelves - $325
misc. hardware and lighting - $250
custom cabinet work - a day's worth of sweat equity
Having a new haven in the basement - priceless
The slideshow gives you an idea of how I have transformed the basement over the past year or so. The original owners used the basement living space as a play area for the kids - why should I be any different?
So the truth be told, one of the factors for buying this particular house, was the presence of a basement living space that could be set up for home theatre. It was supposed to be a bit of a longer term plan, as I had designed the upstairs TV area with full theatre surround (5.1) capability. But the wheels were spinning, and a google, here, and a click there, and I was sold on putting a front projection system in the basement living room.
Actually, I had sold myself on a cool Optoma H31/screen combo from Costco, but then a buddy of mine told me that another co-worker in Calgary was selling one of his two projectors (long story). So for only $650, I was able to get a pretty decent projector and a ceiling mount. Add a 92" screen from Costco for only $239, and I'm doing big screen theatre for under a grand!
Ok, so I already had a pair of Bose 301s from 1979, a pair of Bose 201s and a Polk Audio centre, the Denon receiver and a DVD recorder (need the tuner to watch TV). The cool thing about the Denon receiver, is that it can do component video switching, which makes cabling and user interface much easier. Purists would say to run the signals separately, but the neophyte can't see the difference. Besides, what are you going to compare it to?
 One of the reasons why this room works so well as a home theatre, is the acoustics. Any engineer understands the wave properties of sound, and the behaviour of a a wave as they hit solid objects. I won't get into the physics of standing waves and their cancellation effects; essentially audio sounds great when you have a room with the right dimensions. All the fancy home theatre mags talk about building your room to fit the acoustic dimensions shown right - I just got lucky. With a height of 6' 6", 11' wide and a little over 14' long, it is almost exactly the right ratio to match what is called Sepmeyer's golden room ratio (in my case, Room C). All I know, is that without anything fancy, the sound is awesome down there. I also swapped my little 8" Yamaha sub with the bigger 10" Harman Kardon from upstairs. Needless to say, Christine has to flick the lights from the top of the stairs to get me to turn it down :)
Since the room was finished already, but when I put down the new laminate flooring (for the upcoming addition of our new puppy) I was able to hide the wiring for the rear speakers and an additional Cat 5 ethernet run. The last, best thing for the home theatre setup, was a Logitech Harmony remote. It's the coolest thing to replace the 5 remotes that I needed to run the complete system... and it can all be operated by menu-driven commands. Very cool.
 Having the home theatre in the basement is great, and we have been watching lots of movies down there. However, the room was kinda weird. I had a big tube TV in the corner; because of it's size, I had the leather club chair on the wrong side of the room. After browsing through many home theatre web sites, I found that all the designs were geared towards using the room as a theatre 100% of the time. I didn't want rows of seats, but rather a room that was inviting even when the big screen isn't in use. I was flipping through a home reno mag, I came across this basement design shown left. I didn't have room for a fireplace (would have been nice), but I liked the idea of keeping the brown wood accents. It would be nice to have a wet bar and all the cool stuff that is shown in the example, but the kitchen is only a few steps away, so I don't really need it. But this room was pretty close to the look of mine, and gave me the inspiration I needed.
The basement was probably finished sometime in the 70s, and the doors, mouldings and windows were stained and finished medium brown. I already had a medium brown entertainment unit, and a coffee table that roughly matched. So after a week or two of pondering the design, I came up with an open bookcase surround for the screen. I figured it would "finish" that end of the room up - it was a haphazard collection of stuff that needed organising.
The 24" tube TV that Bob gave me had to go. It was on the wrong side of the room, and it forced the leather club chair to the right. That made it kind of awkward, as it sat in front of the couch - not even close to a conversational angle. So by getting rid of the tube, it allowed me to put the club chair on the other side, and make much better use of the space. I picked up a cheap ($300) LCD TV for watching the Simpsons (or anything but Survivor) while Chris is taking in America's Top Model upstairs.
Saturday, January 7, 2006
1st year behind us...
Here we are, sometime in the late winter 2006 timeframe, and I finally got around to taking some pics of the finished main floor in daylight. As you can see, there's plenty of room to manoeuvre in the kitchen now, and with the drop cedar ceiling gone, I was able to extend the upper cabinets right to the ceiling. We love the antique British pub table and two chairs that serve as our breakfast sitting area... we picked it up out of the Buy and Sell.
I went with appliances that were clean and crisp looking - the range is a "slide-in" with a smooth black ceramic surface that doesn't disrupt the granite line. The Fisher-Paykel fridge is "counter-depth" - it's not as big as an Amana, but we don't need the space, and it doesn't overpower the kitchen. Since we watch TV in the adjoining room, I chose a mid-range Bosch dishwasher. Sometimes, when we're watching TV, I'll be like, "hey, what is that noise? Is there something going on outside?" Then we'll realize that it's just that the dishwasher is on. A microwave/hood fan combo and a 40-bottle wine fridge round out the kitchen appliances.
I'm glad I built the "Island" (more like a peninsula, really) the way I did. It is where we do most of our day-to-day stuff, and the orientation of the drawers didn't allow for the bar stools to face the other way. When we are entertaining, it is the focal point of the room. On the other side, the "not-so-great-room", as I call it (since the likes of the Rudds, Pulvers and Petters have "great rooms" in their houses, it wasn't fair to call mine equal), we've created a sitting area where we do most of our daily TV viewing etc.
The design concept I had for the bathroom was a hotel-style, a-la Westin, or W Hotel. High contrast, brown on stark white, while retaining a period-look with the Sottini brushed finish faucet and the 1920s train-style towel bars. We found a great mirror at Costco that fit the space above the vanity perfectly, and virtually matched the cabinet colour/finish.
The dining room is actually the only room that was left pretty much untouched, except paint, of course. Christine got me an awesome Art Deco sideboard since these pics, and we've recovered the 1980s print on the dining chairs too.
I finished the mouldings and the fireplace just in time for our open house/Christmas party. I wanted again to retain the 30s look, so I scoured the web for Art Deco fireplace mantles, and came up with something that I could modify to meet my tastes. Since I was going with the white against "Currant Jam" look, it was easy to make the mantle out MDF and create the chevron detail (hard to see from the pic). I went for a gas fireplace insert, as I know from past experience, that I don't use a fireplace if I have to go out into the cold to cut kindling!
What's next? Not sure... I'm catching up now on the maintenance things that the previous owner never did. I replaced the furnace and water heater over the winter, the roof is next, and of course, more painting. I also spent the winter battling the garage leak issue, but manage to work out an interim solution that should keep me dry until I re-surface it and put in proper flashings and gutters.
I went with appliances that were clean and crisp looking - the range is a "slide-in" with a smooth black ceramic surface that doesn't disrupt the granite line. The Fisher-Paykel fridge is "counter-depth" - it's not as big as an Amana, but we don't need the space, and it doesn't overpower the kitchen. Since we watch TV in the adjoining room, I chose a mid-range Bosch dishwasher. Sometimes, when we're watching TV, I'll be like, "hey, what is that noise? Is there something going on outside?" Then we'll realize that it's just that the dishwasher is on. A microwave/hood fan combo and a 40-bottle wine fridge round out the kitchen appliances.
I'm glad I built the "Island" (more like a peninsula, really) the way I did. It is where we do most of our day-to-day stuff, and the orientation of the drawers didn't allow for the bar stools to face the other way. When we are entertaining, it is the focal point of the room. On the other side, the "not-so-great-room", as I call it (since the likes of the Rudds, Pulvers and Petters have "great rooms" in their houses, it wasn't fair to call mine equal), we've created a sitting area where we do most of our daily TV viewing etc.
The design concept I had for the bathroom was a hotel-style, a-la Westin, or W Hotel. High contrast, brown on stark white, while retaining a period-look with the Sottini brushed finish faucet and the 1920s train-style towel bars. We found a great mirror at Costco that fit the space above the vanity perfectly, and virtually matched the cabinet colour/finish.
The dining room is actually the only room that was left pretty much untouched, except paint, of course. Christine got me an awesome Art Deco sideboard since these pics, and we've recovered the 1980s print on the dining chairs too.
I finished the mouldings and the fireplace just in time for our open house/Christmas party. I wanted again to retain the 30s look, so I scoured the web for Art Deco fireplace mantles, and came up with something that I could modify to meet my tastes. Since I was going with the white against "Currant Jam" look, it was easy to make the mantle out MDF and create the chevron detail (hard to see from the pic). I went for a gas fireplace insert, as I know from past experience, that I don't use a fireplace if I have to go out into the cold to cut kindling!
What's next? Not sure... I'm catching up now on the maintenance things that the previous owner never did. I replaced the furnace and water heater over the winter, the roof is next, and of course, more painting. I also spent the winter battling the garage leak issue, but manage to work out an interim solution that should keep me dry until I re-surface it and put in proper flashings and gutters.
Tuesday, June 7, 2005
The re-build begins...
As you can see, the first step, was to get a guy (and his son) to come in and re-finish the oak and fir flooring. In one day, they come in, sand it, fill the cracks, sand again, put on a sealer, and then a thick finish layer, I went with a high gloss for the best durability. I expected great results from the oak, but was surprised how great the fir came out.
Al came over again to help with re-tiling the bathroom. I put down some self-leveller for a nice base, then put down a radiant heat mat. The vanity and linen tower wasn't my first choice, but I couldn't find anything else that I wanted... I'm happy with the choice now.
As you can see from the stacks of boxes, I did the kitchen myself too. It's kinda like LEGO, except there's no picture on the front of the box to go by. I wanted a slightly traditional cabinet style, but wanted an elegant look as well. I had re-done part of my cabinets in my condo, but this was a lot more of a clean slate to start with. I would have preferred Ikea cabinets, as they are much easier to build and install, but Home Depot had a great colour/door style, and the price was right.
You'll see not only kitchen construction, but also a small entertainment stand that I built out of spare parts from the kitchen cabinets. The small closet that we tore out made the perfect space for the TV area, and since the fir flooring was screwed up in that area, it made sense to make a built-in. I also made a bed out of some scrap wood that we tore out of the kitchen, as I wanted to keep my bed frame and night tables intact downstairs (besides, I wasn't going to tear apart and re-assemble it again!).
The last few shots show how things looked after the guys came in to install my new granite counters and the marble in the bathroom. We're really turning the corner now!
Al came over again to help with re-tiling the bathroom. I put down some self-leveller for a nice base, then put down a radiant heat mat. The vanity and linen tower wasn't my first choice, but I couldn't find anything else that I wanted... I'm happy with the choice now.
As you can see from the stacks of boxes, I did the kitchen myself too. It's kinda like LEGO, except there's no picture on the front of the box to go by. I wanted a slightly traditional cabinet style, but wanted an elegant look as well. I had re-done part of my cabinets in my condo, but this was a lot more of a clean slate to start with. I would have preferred Ikea cabinets, as they are much easier to build and install, but Home Depot had a great colour/door style, and the price was right.
You'll see not only kitchen construction, but also a small entertainment stand that I built out of spare parts from the kitchen cabinets. The small closet that we tore out made the perfect space for the TV area, and since the fir flooring was screwed up in that area, it made sense to make a built-in. I also made a bed out of some scrap wood that we tore out of the kitchen, as I wanted to keep my bed frame and night tables intact downstairs (besides, I wasn't going to tear apart and re-assemble it again!).
The last few shots show how things looked after the guys came in to install my new granite counters and the marble in the bathroom. We're really turning the corner now!
Saturday, May 7, 2005
Demolition begins!
May 7, take occupancy, and arrive with a bag full of tools and start to work immediately! Al came over, and went to work on the cabinets in the kitchen. We removed them gently, so that I could re-use them in the garage. My buddy Adam also came over, as he thought he might salvage some of the cedar. The shots you see of the kitchen are sans cedar, and you can see the wall that we took out between the kitchen and the small bedroom (4th pic in the list).
While it doesn't look like that much work, try to imagine eight pickup truck loads of debris... then imagine sweeping/picking it all up, and carrying it by hand out to the curb. I lost about 10 lbs that summer. Tried to eat as much as I could, and I was still burning more energy than I could ingest. Not to mention how dirty and messy it was. All the pics show things as I was cleaning up for the day. Take a wrecking bar to plaster and lathe, and crap flies everywhere!
You'll notice some detail pics where the wall came down. The previous renovator had put a wall oven into this wall, and in order to fit the cabinet in, they simply cut the 2x4 studs! No header, no additional support! You could actually see cracks in the plaster where the ceiling had sagged slightly. Luckily, there is no livingspace over the kitchen, so it wasn't in danger of collapsing. I put up a temporary support wall, and hired a guy to build a support beam to carry the load. In ~4 hours, this guy comes in and out - a brand new beam for under $400.
I took some surfaces down to the lathe, some down to the original plaster only. If the plaster was ok, we simply ran 1/4" drywall right on top. Where the plaster was falling or in bad shape, we put up 5/8". With my new flush-mounted beam, it makes for a seamless transition between kitchen and TV area.
I love the pic of the living room, with the cedar and brick hearth removed. It looks like something straight out of a war zone.
I decided early on to expose the brick chimney (from the furnace downstairs) and clean it up, and use it as a showpiece in the kitchen. I put a wire brush into my drill, and set Christine loose on it. After blowing off the dust/debris, and a few coats of clear spray enamel, it looked pretty good.
I had to "re-order" some of the fir planks, so that where the wall ended before, you wouldn't see a straight line where a bunch of planks all stopped. You can barely see it now. Finally, the last few pics show the condition of the floor either under the carpet underlay, or the lino. I should say, layers of lino... there was a floating floor on top of lino, on top of plywood, over the original lino. We know that, because we found newspapers from 1938 under the last layer. We kept some cool adverts from them, framed and hung them around the house.
While it doesn't look like that much work, try to imagine eight pickup truck loads of debris... then imagine sweeping/picking it all up, and carrying it by hand out to the curb. I lost about 10 lbs that summer. Tried to eat as much as I could, and I was still burning more energy than I could ingest. Not to mention how dirty and messy it was. All the pics show things as I was cleaning up for the day. Take a wrecking bar to plaster and lathe, and crap flies everywhere!
You'll notice some detail pics where the wall came down. The previous renovator had put a wall oven into this wall, and in order to fit the cabinet in, they simply cut the 2x4 studs! No header, no additional support! You could actually see cracks in the plaster where the ceiling had sagged slightly. Luckily, there is no livingspace over the kitchen, so it wasn't in danger of collapsing. I put up a temporary support wall, and hired a guy to build a support beam to carry the load. In ~4 hours, this guy comes in and out - a brand new beam for under $400.
I took some surfaces down to the lathe, some down to the original plaster only. If the plaster was ok, we simply ran 1/4" drywall right on top. Where the plaster was falling or in bad shape, we put up 5/8". With my new flush-mounted beam, it makes for a seamless transition between kitchen and TV area.
I love the pic of the living room, with the cedar and brick hearth removed. It looks like something straight out of a war zone.
I decided early on to expose the brick chimney (from the furnace downstairs) and clean it up, and use it as a showpiece in the kitchen. I put a wire brush into my drill, and set Christine loose on it. After blowing off the dust/debris, and a few coats of clear spray enamel, it looked pretty good.
I had to "re-order" some of the fir planks, so that where the wall ended before, you wouldn't see a straight line where a bunch of planks all stopped. You can barely see it now. Finally, the last few pics show the condition of the floor either under the carpet underlay, or the lino. I should say, layers of lino... there was a floating floor on top of lino, on top of plywood, over the original lino. We know that, because we found newspapers from 1938 under the last layer. We kept some cool adverts from them, framed and hung them around the house.
Subscribe to:
Posts (Atom)